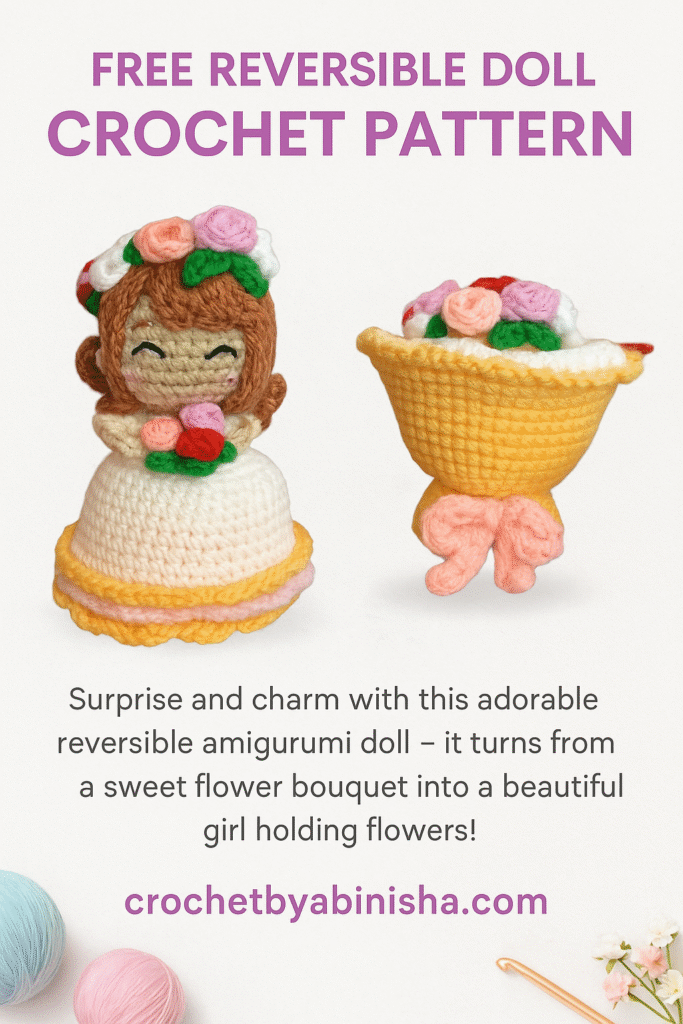
In this post, I’m sharing a step-by-step reversible amigurumi doll pattern that turns from a bride into a beautiful bouquet!
Designed by Abinisha
Skill Level: Intermediate
📺 Tutorial Video: https://youtube.com/playlist?list=PL4Z_EBV3zT_P4DOXcDKAo3ehu4zWrksfd&si=AIEQlvvDRf_elQQ7
🧵 Materials
- Anti-pill acrylic yarn (skin, white, pink, light peach, light yellow, brown, green)
- Crochet hook (2.5mm–3.5mm)
- Fiberfill stuffing
- Yarn needle
- Stitch marker
- Scissors
Check out the materials I used 👉 : https://youtu.be/7zzZOcc4pYM?si=yj_7dbOimLTH866i
✨ Abbreviations
- MR – Magic Ring
- SC – Single Crochet
- INC – Increase (2 sc in same stitch)
- DEC – Decrease (sc 2 together)
- CH – Chain
- SL ST – Slip Stitch
- BLO – Back Loop Only
- FLO – Front Loop Only
👩🎨 Head and Body (Skin Color)
First, start with a magic ring and crochet:
- R1: 6 sc in MR (6)
- R2: Then, make 6 increases (12)
- R3: Next, (sc, inc) × 6 (18)
- R4: Continue with (sc, inc, sc) × 6 (24)
- R5: After that, (5 sc, inc) × 4 (28)
Now, maintain the stitch count:
- R6–R12: 28 sc (28)
Then, start decreasing:
- R13: (5 sc, dec) × 4 (24)
- R14: (sc, dec, sc) × 6 (18)
- R15: (sc, dec) × 6 (12)
To begin the base for the dress, do the following:
- R16: FLO (sc, inc) × 6 (18), then switch to white yarn
- R17–R18: 18 sc
Finally, fasten off, leaving a long tail for sewing.
✋ Arms (Make 2, Skin Color)
- To make the arms:
- Chain 12
- Starting from 2nd ch from hook: 11 sc
- Fasten off, leaving a long tail
- Next, attach the arms to the body (between R16–R17, wrong side facing out).
💇♀️ Hair (brown)
First, crochet the base cap:
- R1: 8 sc in MR
- R2: 8 inc (16)
Now, slip stitch into the first 5 stitches of R2 and begin working strands:
- Strand 1: ch 14 → sl st, 12 sc, sl st
- Strands 2–5: ch 8 → sl st, 6 sc, sl st
- Strand 6: ch 14 → sl st, 12 sc, sl st
- Strands 7–16: ch 16 → sl st, 3 sc, 13 hdc, sl st
After completing all strands, fasten off, leaving a long tail. Sew the hair to the head (wrong side facing out).
🧵 Face Embroidery
- Using black yarn:
- Embroider eyes on R10
- Embroider eyebrows on R8
- Then, use pink yarn to add blush between R11–R12.
Head, body, arms, hair, and face embroidery tutorial 👉 : https://youtu.be/mozz8NkpHtc?si=pTHnJYiteRtIx-O3
👗 Skirt (White Yarn)
To begin, start with a magic ring:
- R1: 6 sc in MR (6)
- R2: 6 inc (12)
- R3: (sc, inc) × 6 (18)
- R4: (sc, inc, sc) × 6 (24)
- R5: (3 sc, inc) × 6 (30)
- R6: (2 sc, inc, 2 sc) × 6 (36)
- R7: (5 sc, inc) × 6 (42)
Next, crochet even rounds:
- R8: 42 sc
- R9: (3 sc, inc, 3 sc) × 6 (48)
- R10–13: 48 sc
- R14: (7 sc, inc) × 6 (54)
- R15–16: 54 sc
Now, to prepare for the edging:
- R17: BLO 54 sc
- R18: 54 sc
Finally, fasten off and leave a long tail.
✨ Skirt Edging (Light Yellow)
First, attach yellow yarn to the FLO of R16.
Then, work the pattern:
(sl st, sc, hdc inc, sc) × 13, 2 sl st
Fasten off and hide the yarn tail.
🌸 Bouquet Wrapper (Light Yellow Yarn)
Leave a 10 cm starting tail for later joining with bouquet.
R1: 6 sc in MR (6)
R2: 6 inc (12)
R3: (sc, inc) × 6 (18)
R4: BLO (sc, inc, sc) × 6 (24)
R5: (3 sc, inc) × 6 (30)
R6: (2 sc, inc, 2 sc) × 6 (36)
R7: (5 sc, inc) × 6 (42)
R8: 42 sc
R9: (3 sc, inc, 3 sc) × 6 (48)
R10–13: 48 sc
R14: (7 sc, inc) × 6 (54)
R15–16: 54 sc
R17: BLO 54 sc
R18: 54 sc
Fasten off, leaving a long
tail.
Watch the tutorial for the skirt and bouquet wrapper here → https://youtu.be/Q3jm1mTvURY?si=zB7lgDC3vD-FGRgJ
🎀 Ribbon
Main Bow
First, ch 25. Then:
- R1: [2sc, 2hdc, 4dc, 2hdc, 2sc] × 2
- R2: Repeat R1 in BLO
Next, fold both ends to the center and sew together.
Bow Tail
- MR → [ch 10, 5dc, 2hdc, sc, sl st to MR] × 2
- Fasten off and sew behind bow
Finally, attach to bouquet.
Click here for the bow tutorial → https://youtu.be/wxG1OKsZ2GE?si=8UhmwHT47RjIA8FI&t=30
🌼 Flowers
Flower 1 (Make 6)
- CH 6
- hdc, hdc inc, hdc, ch2, hdc inc in same st
- Repeat pattern, roll into rose and sew
Flower 2 (Make 10)
- CH 6
- From 2nd ch: sc, inc, 3×inc
- Roll and stitch
Flower 3 (Make 3)
Tighten and fasten off
MR → [ch 4, sl st to MR] × 5
🌿 Leaves
Leaf Type 1 (Make 3)
- CH 5 → sl st, sc, hdc, sl st
- CH 4 → sl st, sc, sl st
Leaf Type 2 (Make 3)
CH 4 → sl st, sc, sl st
Click here to watch the flowers and leaf tutorial → https://youtu.be/wxG1OKsZ2GE?si=H4Cs1ZPbKFrai9XR&t=789
🧷 Assembly Instructions
- Sew head to skirt (R3–R4 area), lightly stuff if needed
- Attach arms, 3 flowers, and leaves to skirt
- Insert bride into bouquet wrapper (wrong side facing out), tie MR tails to join
- Sew BLO of last rounds together
- Decorate bouquet wrapper edge (FLO of R18) with:
(sl st, sc, hdc inc, sc) × 13, 2 sl st - Turn inside out
- In skirt side (FLO of R18), repeat same border with white yarn
- Finish off and weave all ends
🎉 Your Reversible Doll is Ready!
Bride on one side 👰, bouquet on the other 💐 — such a fun and creative project!
📺 Watch the full tutorial here: https://youtube.com/playlist?list=PL4Z_EBV3zT_P4DOXcDKAo3ehu4zWrksfd&si=maGhGde9nhdXqBbQ
📷 Share on social media with hashtag #AbinishabyCrochet
🔖 Designer Credit
Original reversible doll design by Febby Pranajaya (@chibiscraft).
This version has been edited and simplified for beginners by Abinisha for tutorial purposes.
Shared with full credit and for non-commercial use only.
🌼 Related Crochet Pattern:
Want to make a cute flower vase to match your bouquet doll?
👉 Check out my Crochet Flower Vase Pattern


Waiting for this tutorial. Thank you so much
Hi, the full tutorial is already uploaded on my YouTube channel. The link is given within the pattern itself.